
Tales From The Keyboard: Getting To Know Docker
At work, we use docker for local development and production. When I first started in this job (3+ years ago), I had barely heard about Docker. I have grown to love/hate Docker, although the hate part is not so much about how Docker solves problems but more about how we are using Docker. The love part is because I do find containers interesting, however I also think containers can get over-used and processes get unnecessarily over-complicated. In this Tale we’ll visit some struggles I (and other team members) had when first getting to know Docker.
First, some context. Here at the Texas Advanced Computing Center (TACC) we build Science Gateways, amongst other amazing things. Science Gateways can get very complicated, for the sake of simplicity let’s think about Science Gateways as a distributed web application. We use Mysql or Postgres for database, Django for the back-end, AngularJS (currently upgrading to something else, haven’t fully decided what) for the front-end, and we run all of this in containers. There are other services we use but this gives enough information to get the picture of the dev environment we’ll be talking about.
How Is Docker Running In Your Computer?
The projects we work here at TACC are, what we call, highly distributed.
We use the term highly distributed because these projects use multiple
services build by different teams. Some of these services are exposed
via REST APIs and some others are HPC resources. For instance, TACC’s main
storage resource is called Corral3. For specific type of data
we have to do a Network File System (NFS) mount to have direct
access from the host where we have Python/Django applications running.
NFS mounts are common to use specially when you want a storage system that’s robust.
In production this is quite simple to set up using fstab and in our
development environment (using docker) it’s easy to simulate since the host
is the one who mounts the NFS and then docker sees the mount as a regular
folder. The development cycle runs smoothly until some serious debugging is
necessary. I had to do an NFS mount directly in my laptop to figure out
this one bug. I’m currently using a Mac Book Pro and had to use FUSE
and do an SSHFS mount. The permissions on the mount were correct.
I then fired up docker-compose and waited
for everything to run, then I saw this error:
ERROR: for <service name>  Cannot start service <service name>:
b'Mounts denied:
The path /path/to/mount
is not shared from OS X and is not known to Docker.
You can configure shared paths from Docker -> Preferences... ->
File Sharing.
See https://docs.docker.com/docker-for-mac/osxfs/#namespaces
for more info.'
One good thing is that the error is very explicit and it tells you right there where to get more information to fix it. It is still odd to get this error since I’m running docker for mac and it feels native. Here’s the catch: it feels and sounds native, but it is not native. Docker describes how Docker for Mac differs from Docker Toolbox. They do describe it as a native application but only because it uses Hyperkit, although this means there is still a VM between OSX and Docker. It is simpler to use, but we have to keep this structure in mind. After looking into how Docker for Mac runs it is easier to understand why we cannot mount folders into our Docker containers a la willy-nilly. The fix is to let the Docker VM know about the folder(s) we want to mount. We configure the paths the Docker VM can see in the Docker settings. This is called File Sharing.
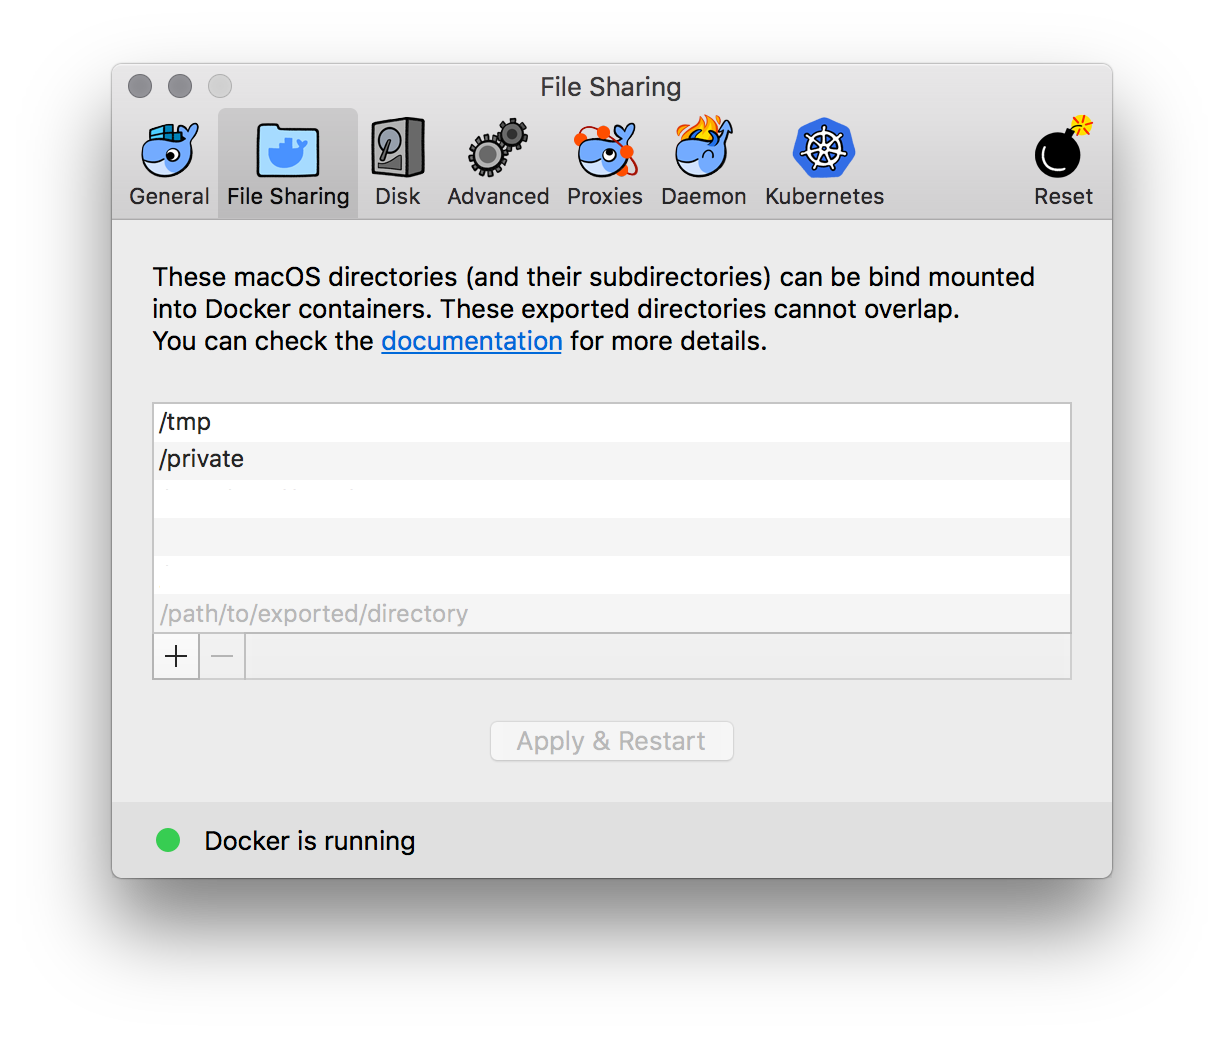
$HOME/projects folder to save some time.
Once this is set up one can mount any path and sub-path in the previously shown
list using -v or volume in a docker-compose.yml file.
Another thing that threw me off was when we started using
elasticsearch. Elasticsearch maps indices into memory using a
specific type of file system. This memory mapping allows elasticsearch to be
really fast. The trick here is that Linux will
restrict memory mapping to only a portion of the available virtual memory
address space. The restriction is necessary mainly to protect other processes
to not hog all the virtual memory address space. On Linux operating systems
this is easily fixed with one command sysctl -w vm.max_map_count=262144.
There is more information on elasticsearch’s site.
Once again, we were able to set up the correct max_map_count in our prod
environment without any hassles. An interesting thing happened when I was
first trying out elasticsearch in development. After setting up the
elasticsearch container and starting up the project locally we saw this error:
ERROR: bootstrap checks failed max virtual memory areas
vm.max_map_count [65530] likely too low, increase to at least [262144]
The previous error is expected if the virtual memory is too low and the
elasticsearch docs are handy when solving this. The sysctl command to
increase the max_map_count needs to be run on the host environment.
Naturally I tried running the command on OSX only to get this error in return:
sysctl: unknown oid 'vm.max_map_count'
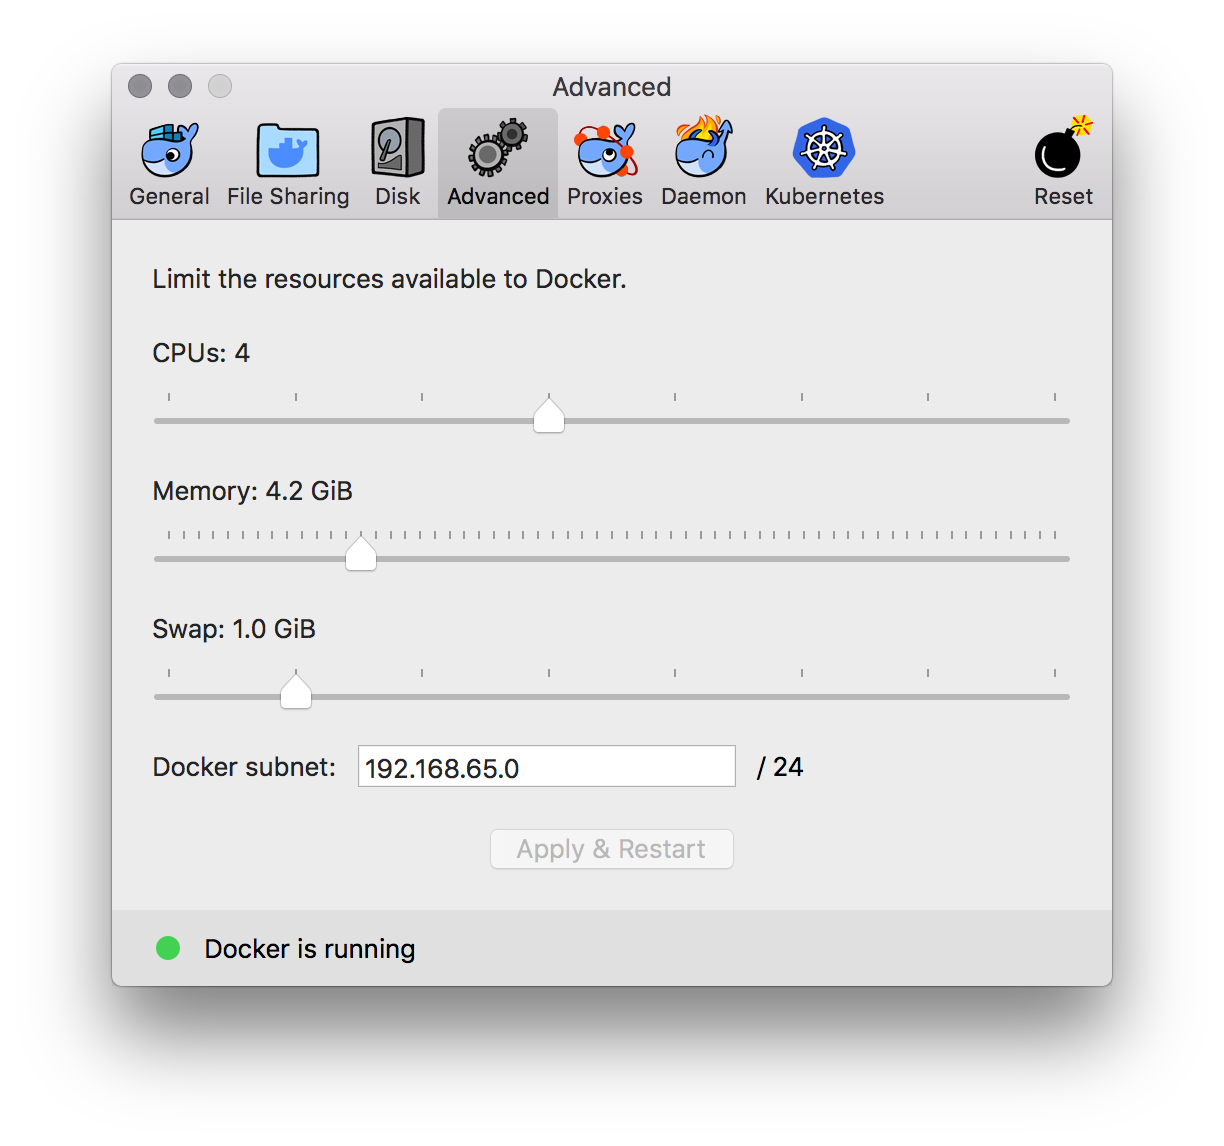
“How curious”, I thought. I then remembered that Docker for Mac does not actually run on OSX instead it runs on a VM. This means the memory Elasticsearch is using is actually the memory the Docker VM has access to. Usually incrementing the memory through Docker’s settings is enough:
If that is not enough, there is a way to actually drop into a tty on the
Docker’s VM (which is the actual host of your containers). You can run this
command:
screen ~/Library/Containers/com.docker.docker/Data/vms/0/tty
If you’re using Docker for Windows and running the regular Linux daemon you can also drop into a shell within the tiny Linux VM using nsenter.
Dabbling in docker-compose
docker-compose is defined as: “a tool for
defining and running multi-container Docker applications.”. docker-compose
can be used in different ways other than running multiple containers. I’ve seen
projects where it’s used as a way to run management commands. It is common to
see a docker-compose.yml file on a project which defines the entire
environment of said project.
Soon after starting to use docker-compose in a
project I realized I had to update the file in different ways to test things
locally. Usually these are only tests and I don’t necessarily want to track
this changes with git. Luckily I realized docker-compose can merge multiple
files. By default docker-compose will look for two files:
docker-compose.yml and docker-compose.override.yml. I tend to add the
.override file to .gitignore that way I can override different values locally
without worrying messing up everybody else’s setup. This allows you to have a
docker-compose.yml file such as:
django:
  image: project/portal:local
  links:
    - potgresql:postgresql
    - memcached:memcached
  volumes:
    - ./../src:/srv/www/project
    - /srv/www/project/static:/srv/www/project/static
    - /srv/www/project/media:/srv/www/project/media
  ports:
    - 8000:8000
  command: newrelic-admin run-program /usr/local/bin/uwsgi --ini /srv/www/project/wsgi.py
Which can then be overridden with a docker-compose.override.yml file such as:
django:
  volumes:
    - ./../src:/srv/www/project
    - static:/srv/www/project/static
    - media:/srv/www/project/media
  ports:
    - 8001:8000
  command: /srv/www/project/bin/run-dev.sh

volumes:
  static:
  media:
This would result in a docker-compose config file such as:
django:
  image: project/portal:local
  links:
    - potgresql:postgresql
    - memcached:memcached
  volumes:
    - ./../src:/srv/www/project
    - static:/srv/www/project/static
    - media:/srv/www/project/media
  ports:
    - 8000:8000
    - 8001:8001
  command: /srv/www/project/bin/run-dev.sh

volumes:
  static:
  media:
As we can see not every value gets simply overridden after merging.
docker-compose treats fields with the next policy:
- Single-value: (e.g.
image,commandormem_limit) The value from the.overridefile will be used. - Multi-value: These fields are treated as arrays or maps and depending on the type
of field
docker-composewill act differently:ports,expose,external_links,dns,dns_searchandtmpfsare concatenated. Meaning we can never completly override the value set on the first file, we can only add more values to the array or map. I recommend being conservative with the value used on the first file.environmentandlabelsare merged together. Meaning, we can add more values to the array or map and we can override previously set values. The trick here is that the values used in this array or map are in the form ofUNIQUE_STRING:VALUE.docker-composewill use the left side of the string as uniqueness and will override values based on that.Note:
environmentvalue can be an array or a map.volumesanddevicesare also merged together. Meaning, we can add more values to the array and we can override previously set values. The difference here is thatdocker-composewill use the right side of the string as uniqueness.docker-composewill see every value asVALUE:UNIQUE_STRING. This makes sense because the right side of the value is unique for the container we are creating.
We can also use other file names and as many as we want taking the previous
rules into consideration. You can read more about overriding configuration in
Docker’s documentation.
The way to do this is to concatenate them using -f flag such as the next example.
$ docker-compose -f docker-compose.local-dev.yml -f docker-compose.local-dev.override.yml -f docker-compose.local-dev.shenanigans.yml
I’ve also realized this tends to get confusing and I often loose track of what
I’m overriding and what not. The simple way to check how docker-compose will
end up being configured is to use:
$ docker-compose config
The previous command will print the entire configuration used.
Bringing up and down the house
When we first started using Docker and docker-compose in our projects I found
running and stopping an entire project was a bit confusing. Let me clarify this:
it wasn’t confusing because I wasn’t sure how to check if everything was running
or not, it was confusing because it wasn’t clear to me what was the correct way
to bring up or down all the containers in a project.
First, Let’s talk about projects. A docker-compose.yml
file describes a set of services, and each of these services corresponds to a
container. docker-compose uses the concept of projects to somewhat group
together the containers described in the configuration. In reality a
project uses a project name to manage different container resources.
A
docker-composeproject name can be defined by the configuration’s root folder, by using the-pargument or theCOMPOSE_PROJECT_NAMEenvironment variable.
A project name is prepended to any object’s name defined in the configuration:
- Prepended to every service name. If one of the service’s name is
django, the container created will be namedPROJECT_NAME_django_1unlesscontainer_nameis defined in the service definition. - When defining
volumes in reality the volume’s name is prepended withPROJECT_NAME. We can verify this by usingdocker volume ls. PROJECT_NAMEis also prepended to any network defined. We can also verify this by usingdocker network ls.
Now that we have clarified docker-compose uses docker-compose.yml file and
projects to group together service, volumes and networks let’s talk about
how do we initialize and destroy these objects.
The easiest way to start up everything within a project is to use $ docker-compose up.
This will download or build any images which need to be downloaded or build, create
every container, network and volume defined in the configuration file, and run
all the services defined. docker-compose up is pretty handy and after creating and
running everything it will continue printing the output from every container to
stdout. If you want to run everything in the background you can use the -d
flag to run it as a daemon and keep it in the background.
After using up I realized there’s also start, run and create. This is
a bit confusing since those verbs could potentially be synonyms. I later realized
create is deprecated and should not be used. run is used for when you want
to execute a one-off command inside a container. The container will be created,
the command will be executed inside the container and the container will then be
stopped. I recommend to use --rm to make sure the container is deleted after
the command is run and exits. You can read more about run in the
Docker’s docs. start is also useful, it will only
run containers for the services defined in the configuration. I recommend
to use start only if you need to use stop to temporarily stop services
running.
Note:
docker-compose startdoes not create containers, it will only start containers for services that are already created.
By now we can safely say most of the time we’ll be using docker-compose up
to start our services since it’s the most compact way to create and run
everything necessary. Sometimes we encounter errors when bringing everything
up, when this happens I find it helpful to go step by step:
- Pull necessary images:
$ docker-compose pull - Build necessary images:
$ docker-compose build - Create necessary networks and volumes:
$ docker-compose up --no-build --no-start - Run services:
$ docker-compose start
Note: The previous list is not the actual steps taken by docker, but it is a simple way to simulate what happens.
Note:
docker-compose buildwill only work correctly if the build configuration is defined in thedocker-compose.ymlfile.
Most of the time errors appear when building images, but I find it
helpful to know everything that happens when running docker-compose up.
Let’s take a look how can we bring everything down. I quickly realized
when using $ docker-compose up I was able to hit Ctrl+C and compose will
automatically stop every service. Sometimes this doesn’t work correctly,
I believe it has to do with how
docker processes handle signals. When this happens it is
necessary to use $ docker-compose down, which is pretty simple and compact.
After a while, one is (almost) bound to work with multiple projects. Every
once in a while I encounter an error or a bug that might be related to
docker and not necessarily to the code I’m working on. When something like
this happens I usually first delete every container created for a project.
$ docker-compose rm -f
Something similar can be done using up in this form:
$ docker-compose up --force-recreate
Which recreates every container for every service in the configuration.
Sometimes I have to delete everything from a project to make sure every service is correctly configured and initialized. This is done by removing every container with the command shown above and then:
$ docker-compose down --rmi=all -v --remove-orphans
The previous command will remove all images for a project (--rmi=all),
every volume created (-v) and every orphan container left (--remove-orphans).
Next time I use docker-compose up everything for that project will be created again.
We can use docker-compose down, docker-compose stop or docker-compose kill to stop
the services. The difference between down and stop is that down will delete
any containers and networks created by default, if needed you can specify to delete
volumes as stated above. stop will only stop the containers, you can re-start the services
by using docker-compose start, this is better suited for a temporary stop on services.
If everything else fails you can force the services to be stopped by using kill.
I strongly recommend to only use kill in your local development because some containers
can end up in a false state when using kill. If this happens and you have to run kill in
production I recommend to use docker-compose rm -f to remove all containers and then
bring everything up. This has been really helpful to me a lot of times.
These are some things I learned when I first started using docker. As with any technology, docker can be a breeze to use until it is not. I hope this will be useful to other developers. The Tales from the Keyboard series describes the things me (and other team-members) learned when using different technologies.